 |
|||
|
|
|||
|
Page Title:
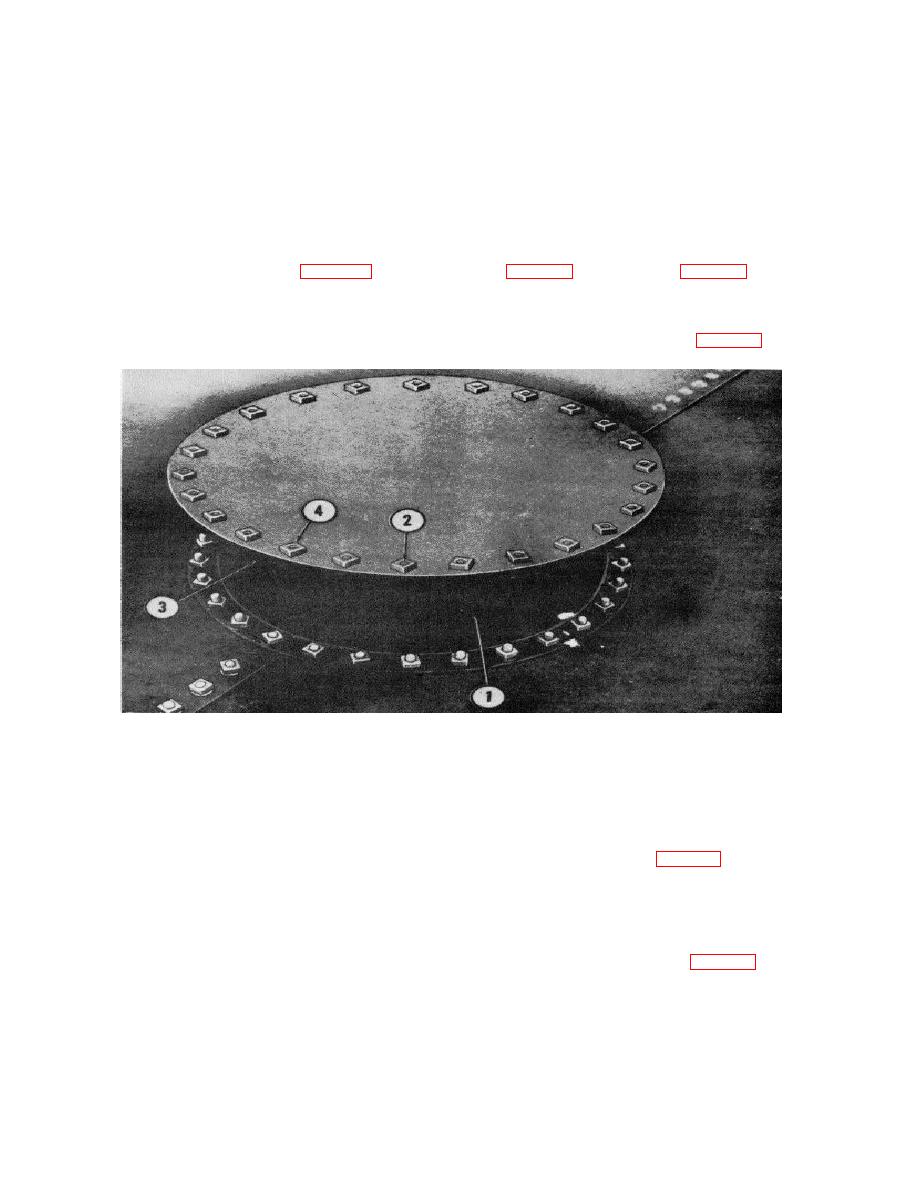
Figure 6-18. Manhole dome and cover installed |
|
||
| ||||||||||
|
|
 TM 5-5430-209-12
(3) From the bottom side of one section (2), install
manhole dome (6).
(8) Place a 30-hole manhole deck gasket (3) over
one assembled channel in each row of bolt holes,
leaving the inner and outer bolt holes of the section
bolt holes of the assembled sections (4). Install wedge
gaskets under gasket (3) at the lap seams. Insert 1/2 by
vacant.
1/4-inch bolts (5) through the sections and gaskets from
(4) Place a retaining board against the heads of
the bottom side.
the bolts and lay the saction on the ground, top side up.
(9) Install manhole dome (6) over bolts (5) and
(5) Place strip gasket (3) over each row of bolts
gasket (3). Install a nut loosely on each bolt.
(1), allowing a 2-hole overhang at each end.
(10)
Install assembled deck sections over bolts
(6) Place other section (2) over bolts (1) and
(6, fig. 6-15) and gasket (3, fig. 6-16) on inner end of
gasket (3). Place steel washer (1, fig. 6-16), cupped
the deck plates.
side down, on each bolt. Install nut (2) loosely on each
d. Manhole Cover.
bolt.
(1) Place a 28-hole manhole cover gasket over
(7) Use 1/2 by 1-inch bolts and steel recessed
bolt holes in manhole dome (1, fig. 6-18).
washers to seal holes in vertical portion of the
MANHOLE DOME
1.
BOLT
2.
MANHOLE COVER
3.
NUT
ME 5430-209-12/6-18
4.
Figure 6-18. Manhole dome and cover installed
(2) Insert 1'2 by 11/2 -inch bolts (2) through dome
evenly in each seam.
flange and gasket from bottom side. Gasket will hold
(3) Tighten nuts (2, fig. 6-16) on bolts of the deck
bolts in place.
center section (4) lap seam.
(3) Install manhole cover (3) over bolts and
(4) Tighten nuts on bolts at the inner and outer
gasket. Install nuts (4) on bolts and tighten the nuts
circumference of the deck center sections.
securely.
f. Scaffold, Removal. After removal of scaffold,
e. Tightening Tank Deck.
store components in the storage tank erection outfit.
(1) Tighten all nuts on deck chime bolts (5, fig. 6-
(1) Remove rope rails (6, fig. 3-17) from posts (5),
14) uniformly.
and remove posts from bracket (1).
(2) Start at the outer end of each deck plate lap
(2) Remove wire (4) and boards (3) from the
seam and work toward the inner end, tightening nuts
brackets.
6-19
|
|
Privacy Statement - Press Release - Copyright Information. - Contact Us |
